Push a Diffusers model
Learn how to push a Hugging Face Diffusers image generation model to Replicate as a scalable API.
Table of contents
Learn how to push a Diffusers image generation model to Replicate as a scalable API.
Intro
Diffusers is an open-source Python library that provides a consistent interface for using diffusion models for image generation, the most popular of which is Stable Diffusion.
There are lots of ways to use Stable Diffusion: You can run it from your browser on Replicate’s website, or run it from your code using Replicate’s API. You can even run it on your own machine.
But what if you want to customize the model? There are a lot of things you might want to change:
- Use custom/pretrained weights or styles. There are lots of variants of Stable Diffusion trained on different styles of images, like OpenJourney, Analog Diffusion, and Realistic Vision.
- Use a different image format. Stable Diffusion returns an uncompressed PNG by default, but you might want to also return a compressed JPEG or WebP image.
- Generate a batch of outputs. You could update the prompt input to accept a delimited string of multiple values and generate a batch of 200 images at once to reduce API call overhead.
- Remove some inputs you don’t care about. Many machine learning models have a lot of inputs, but you might only care about a few of them. You could remove the ones you don’t care about, and make the model easier to use. For an example of this, see lora-training and lora-advanced-training.
- Change the scheduler. Schedulers give you a way to configure a speed-vs-quality tradeoff in your model.
In this guide we’ll walk you through the steps to create your own model, so you can make these kinds of changes and push them to Replicate as your own public or private model with a stable API.
Prerequisites
To follow this guide, you’ll need:
- An account on Replicate.
- Docker. You’ll be using the Cog command-line tool to build and push your model. Cog uses Docker to create a container for your model. You’ll need to install and start Docker before you can run Cog. You can confirm Docker is running by typing
docker infoin your terminal.
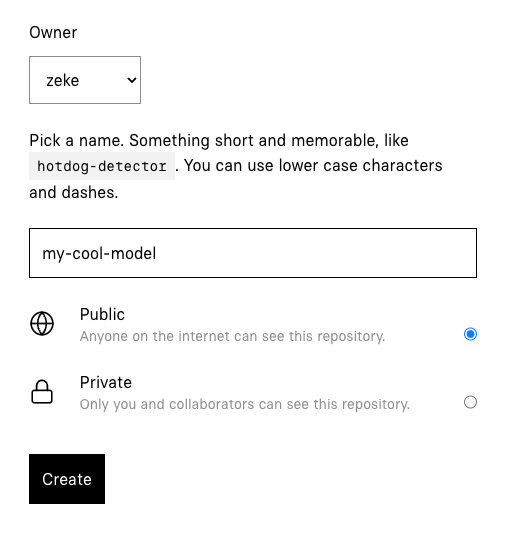
Step 1: Create a model
First, create a model on Replicate at replicate.com/create. If you haven’t used Replicate before, you’ll need to sign in with your GitHub account. You can configure the model to be private so that only you can use it, or public so anyone can use it.
Step 2: Clone the Stable Diffusion repo
Replicate maintains an open-source Stable Diffusion repo on GitHub at replicate/cog-stable-diffusion.
Create your own fork of the repo on GitHub, or clone the repo directly:
git clone https://github.com/replicate/cog-stable-diffusion
cd cog-stable-diffusion
This repo is fairly small, and contains two noteworthy files:
cog.yaml- Defines the CUDA and Python versions, and dependencies for the model. This file tells Cog how to package the model.predict.py- Defines the inputs and outputs of the model, and the code to run the model. The Stable Diffusion model itself is imported through the Pythondiffuserslibrary.
Step 3: Install Cog
Cog is an open source tool that makes it easy to put a machine learning model in a Docker container. Run the following commands to install it and set the correct permissions:
curl https://replicate.github.io/codespaces/scripts/install-cog.sh | bashConfirm that Cog is installed by running cog --version:
cog --version
# cog version 0.9.25 (built 2024-10-07T15:11:47Z)
Step 4: Customize your model
The repo you cloned is configured to build Stable Diffusion 2.1 by default, but you can customize it to use any diffusers-compatible model, including trained models like OpenJourney, Analog Diffusion, and Realistic Vision.
To use a different model, open predict.py and change the value of MODEL_ID to a shorthand {owner}/{repo} string that corresponds to a diffusers-compatible model on Hugging Face:
MODEL_ID = "wavymulder/Analog-Diffusion"If you just want to use a different pretrained model, this is the only change that’s needed.
If you want to make other changes to your model’s behavior, take a look at predict.py, which is the Python interface that defines the inputs and outputs for your model.
Step 5: Download weights
Now that you’ve configured your model, it’s time to download the weights:
cog run script/download-weightsThis process will take a few minutes but you’ll only need to run it once, as it will cache the downloaded dependencies on disk. Get up and stretch, grab yourself a snack, or use this opportunity to add metadata to the model page you created on Replicate in Step 1 by adding a title, README, GitHub repository URL, etc.
Step 6: Run your model
Now that you’ve downloaded the weights, you can run the model locally with Cog:
cog predict -i prompt="monkey scuba diving" -i width=512 -i height=512This will run the model locally and return the output image. You can change the prompt, width, and height to see how the model responds to different inputs. Note that larger dimensions require more VRAM, so 512x512 is a sensible default.
Step 7: Push your model
Now that you’ve customized your model, it’s time to push it to Replicate.
First you’ll need to authenticate:
cog loginThen push your model using the name you specified in Step 1:
cog push r8.im/<your-username>/<your-model-name>Step 8: Use your model
Your model is now live! 🚀
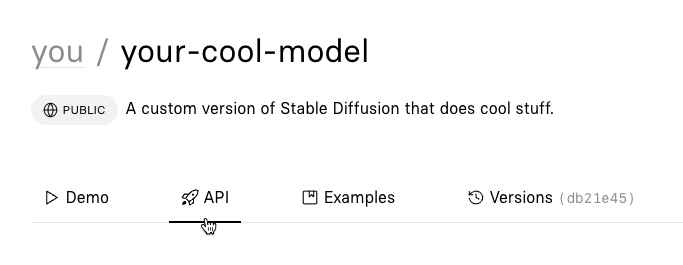
You can run the model from the website by clicking the “Demo” tab on the model page, or you can use the HTTP API to run the model from your own code.
Click the “API” tab on your model page to see example code for running the model:
Next steps
Now that you have your own model, see what else you can do with it.
If you need inspiration or guidance, jump into our Discord.