Upscale images with AI models
Learn how to upscale images
Table of contents
In this guide we’ll cover the many different ways you can upscale images with AI. We’ll cover the pros and cons of each approach, and how to choose the best one for your use case.
What is image upscaling?
Upscaling increases an image’s resolution. AI is used to enhance the image by adding detail and fixing artifacts.
Imagine you have a small, somewhat blurry photo, and you want to make it larger and clearer, like turning a wallet-sized photo into a poster without losing quality. Traditional methods might make the photo bigger, but it would become even blurrier. AI upscaling models work a lot like a smart artist who not only enlarges the photo but also cleverly adds in details to make the larger photo look sharp and clear.
There is also a big overlap between image upscaling and image restoration. AI models for image restoration fix blemishes, remove noise and add detail, which is well suited to the upscaling process.
Classic upscalers
These are fast and cheap to run upscalers that work extremely well for low quality and badly compressed images. They can also fix faces, including distorted AI faces.
- Real-ESRGAN – Fast 4x upscale
- GFPGAN and Codeformer – Face fixing with upscale options
- SwinIR – Fast 4x upscale with good textures
State of the art open source upscalers
Many recent upscalers use diffusion based image generation as a way of hallucinating details and giving higher quality results. These run slower and so are more expensive, but they can go very large and produce magnificent images.
- Upscaling with ControlNet tile – Diffusion based upscaling with tiling
- Ultimate SD Upscale – Power user ControlNet tile upscaling
Upscaling images with Real-ESRGAN
Real-ESRGAN is an upscaler model that is cheap and fast. The Replicate model also incorporates GFPGAN for fixing faces. It improves the quality of images by using a form of AI called a Generative Adversarial Network (GAN).
It is very good at:
- upscaling very small images
- removing image artefacts, such as JPEG compression
- sharpening edges
- cleaning up text (if it’s not too small)
It does not:
- add new details
- fix scratches or other damage
Example upscales
In this example a damaged Victorian photo is upscaled 8x in 5.5 seconds. All the compression artefacts are removed, and the face is improved using GFPGAN. Edges are sharper, the hair especially looks good. But the scratches and other damage are not fixed. There are no new details added.
In another example, we can see how well it deals with a low quality JPEG image of text:
Run in the cloud with an API
Because of its speed and quality in handling low resolution internet images, it is an excellent choice for incorporating into web development pipelines.
With Replicate you can run Real-ESRGAN in the cloud with one line of code.
Run Real-ESRGAN with JavaScript
Try our official JavaScript client to run Real-ESRGAN with Node.js:
npm install replicateSet the REPLICATE_API_TOKEN environment variable:
export REPLICATE_API_TOKEN=[your-api-token]
import Replicate from "replicate";

// Import and set up the client
const replicate = new Replicate({
  auth: process.env.REPLICATE_API_TOKEN,
});

const output = await replicate.run(
  "nightmareai/real-esrgan:latest",
  {
    input: {
      image: "https://replicate.delivery/pbxt/Ing7Fa4YMk6YtcoG1YZnaK3UwbgDB5guRc5M2dEjV6ODNLMl/cat.jpg",
      scale: 2,
      face_enhance: false
    }
  }
);
console.log(output);
Note that Real-ESRGAN takes an image as input. You can provide URLs or base 64 strings here as values for the image.
To learn more, take a look at the guide on getting started with Node.js.
Run Real-ESRGAN with Python
You can also use our official Python client. Read our getting started with Python docs.
pip install replicate
export REPLICATE_API_TOKEN=<your-api-token>import replicate
output = replicate.run(
"nightmareai/real-esrgan:latest",
input={
"image": "https://replicate.delivery/pbxt/Ing7Fa4YMk6YtcoG1YZnaK3UwbgDB5guRc5M2dEjV6ODNLMl/cat.jpg",
"scale": 2,
"face_enhance": False
}
)
# Save the output image
with open('output.png', 'wb') as f:
f.write(output[0].read())You can also run Real-ESRGAN using other Replicate client libraries for Golang, Swift, Elixir, and others.
Fixing faces with GFPGAN and Codeformer
GFPGAN and Codeformer are two models that can fix faces in images.
They are both fast and can be run in the cloud with an API. They are particularly useful as models to run against images generated by other AI models, especially older ones.
GFPGAN
TencentArc’s GFPGAN has long been the go to model for fixing faces in images. Whether that’s correcting them while upscaling, or fixing the mistakes in faces generated by AI.
It is very good at:
- upscaling low resolution faces, such as those in old photos
- fixing early AI’s mistakes in faces, especially eyes
- removing noise from an image
It does not:
- work well with high resolution faces, it tends to remove details
- remove all compression artefacts
- fix scratches or other damage
Use it in modern workflows alongside other upscalers. Fix faces with GFPGAN, then upscale with another model.
Example face fixes
In this example a Midjourney image from 2022 is fixed using GFPGAN in 2.6s.
See how well the eyes are fixed, but also note how some skin blemishes are removed. The sharpening of the soft focus is also noticeable and undesirable.
In another example we can see how GFPGAN fixes the face in an old victorian photo. The face looks really good and much of the identity is preserved. However there are still JPEG artefacts and picture damage.
Run in the cloud with an API
We recommend using GFPGAN via the Real-ESRGAN model on Replicate. Turn on the face_enhance option to enable GFPGAN.
Read about running Real-ESRGAN + GFPGAN with an API.
In this comparison, we compare GFPGAN and Real-ESRGAN:
Codeformer
Codeformer by sczhou is another choice for fixing badly generated AI faces.
Unlike GFPGAN, it will typically leave alone any part of the image that is not a face (you can optionally enhance the background with Real-ESRGAN).
It also takes a more heavy-handed approach to fixing faces. This means it can fix the very worst of AI faces, but when fixes need to be subtle it can degrade likeness.
It is very good at:
- fixing really bad AI mistakes in faces
- upscaling low resolution faces, such as those in old photos
It does not work well with:
- high resolution faces
- faces with lots of compression artefacts
- subtle fixes where likeness needs preserving
In these cases it can get confused and return distorted and broken results.
Example face fixes
In this example, using the same Midjourney image as before, Codeformer fixes the face in 3s.
Notice that the edges of the image are unchanged. The eyes are fixed and the face is improved, albeit they look a little different. Like GFPGAN the skin blemishes have also been removed.
In another example we can see how Codeformer fixes the face in an old victorian photo. The face looks really good and much of the identity is preserved. However there are still JPEG artefacts and picture damage.
GFPGAN vs Codeformer
GFPGAN and Codeformer are both good at fixing faces.
If you want to maintain likeness, use GFPGAN. If the face you need to fix is really bad, try Codeformer. But otherwise they are very similar.
And the Victorian example:
Upscaling images with SwinIR
SwinIR is very good at upscaling small and low quality images. Like Real-ESRGAN, it is fast and cheap to run.
SwinIR is a great choice for incorporating fast upscaling into web development pipelines. For example, at Replicate we used SwinIR as part of our SDXL fine-tuning API to make sure input images were big enough for the model to work with.
It is very good at:
- upscaling very small images
- maintaining likeness when upscaling faces
- keeping textures in the upscaled image
- removing image artefacts, such as JPEG compression
- removing noise
It does not:
- upscale eyes well
- fix AI mistakes in faces
- fix scratches or other damage
Example upscales
In this landscape example a low quality image of mountains with plenty of JPEG compression artefacts is upscaled 4x to 1400px in 4.5 seconds. The output is much sharper and the compression artefacts are removed. The trees and grass have more detail.
In this portrait example a poorly compressed 350px portrait photo is upscaled 4x to 1400px in 4 seconds. All the compression artefacts are removed, and the face has a consistent likeness with the original. Edges are sharper and hair detail is especially good. The eyes need work.
Real-ESRGAN vs SwinIR
If we compare SwinIR to Real-ESRGAN (without any face enhancements), we can see just how much better SwinIR is at upscaling. SwinIR has much better textures, particularly in the facial hair and skin detail.
SwinIR takes longer to run, 4s vs Real-ESRGAN’s 1.4s. But it is still very fast.
Run SwinIR with an API
If you want to incorporate SwinIR into your own web development pipeline, you can use our API to run it in the cloud.
For a 4x upscale use the Real-World Image Super-Resolution-Large task. For a 2x upscale use Real-World Image Super-Resolution-Medium.
Run SwinIR with JavaScript
Try our official JavaScript client to run SwinIR with Node.js:
npm install replicateSet the REPLICATE_API_TOKEN environment variable:
export REPLICATE_API_TOKEN=<your-api-token>Run jingyunliang/swinir:
import Replicate from "replicate";

// Import and set up the client
const replicate = new Replicate({
  auth: process.env.REPLICATE_API_TOKEN,
});

// Run the model
const output = await replicate.run(
  "jingyunliang/swinir:latest",
  {
    input: {
      image: "https://replicate.delivery/pbxt/KK3v1DvsmnfiKf8pm3IAPUpzR43QwrNw9FV0fNiuxSUyrpf0/low-quality-face.jpg",
      task_type: "Real-World Image Super-Resolution-Large"
    }
  }
);

// Save the output image
fs.writeFileSync("output.png", output[0]);
SwinIR takes an image as input. You can use URLs or base 64 strings.
To learn more, take a look at the guide on getting started with Node.js.
Run SwinIR with Python
You can also use our official Python client. Read our getting started with Python docs.
pip install replicate
export REPLICATE_API_TOKEN=<your-api-token>
Run jingyunliang/swinir:
import replicate

output = replicate.run(
    "jingyunliang/swinir:latest",
    input={
      "image": "https://replicate.delivery/pbxt/KK3v1DvsmnfiKf8pm3IAPUpzR43QwrNw9FV0fNiuxSUyrpf0/low-quality-face.jpg",
      "task_type": "Real-World Image Super-Resolution-Large"
    }
)

# Save the output image
with open('output.png', 'wb') as f:
    f.write(output[0].read())
You can also run SwinIR using Golang, Swift, Elixir, and others.
Upscaling images with ControlNet tile
ControlNet tile is a ControlNet model (control_v11f1e_sd15_tile) introduced by Lvmin Zhang (lllyasviel) in May 2023.
You can run it on Replicate with the following models:
- batouresearch/high-resolution-controlnet-tile (a simple model which gives good results)
- fewjative/ultimate-sd-upscale (a more flexible model that exposes each of the ControlNet tile parameters)
- juergengunz/ultimate-portrait-upscale
Use ControlNet tile to:
- upscale 2x, 4x or 8x times
- add, change, or re-generate image details
- fix mistakes from upscaling by other models (like blurring or incoherent details)
It is very good at:
- upscaling medium to large images
- introducing coherent new details
- controlling your upscale with a prompt
- applying an artistic style or direction in the upscale process
However, it:
- does not handle small images well. Anything below 512x512 should be upscaled with something like Real-ESRGAN or SwinIR first. Ultimate SD Upscale can do this for you.
- does not remove compression artifacts like JPEG artifacts. Again, use another model first.
- often loses likenesses in faces. Careful selection of parameters is needed to balance between original image strength and hallucinated details.
- can be tricky to use, and often requires some experimentation to get the best results
How ControlNet tile works
It upscales by hallucinating new details. You can use a text prompt (and negative prompt), to guide the generation of details towards your desired image.
As the name suggests, it is a tile-based approach. The original image is split into tiles, and each tile is upscaled separately before being recombined. Previous tiling approaches were limited by the way each tile interpreted a given prompt. Consider a ‘photo of a man outside’, split into 9, where the top left tile is just sky. Early techniques would try to diffuse an image of a man into that space, as well as every other tile, without a wider understanding of the whole image. ControlNet tile is different.
The clever part with ControlNet tile is that despite the tiles being upscaled separately, the prompt is always applied to the whole image.
ControlNet tile is best used with any Stable Diffusion 1.5 fine-tune. RealisticVision V5.1 and above are a good choice for photorealistic upscaling. There isn’t currently a ControlNet tile model for SDXL.
Example upscales
In this example of a woman in a bright outfit, the image is upscaled from 1024x1024 (a standard SDXL sized output) to 2560x2560 (2.5x) in 38 seconds.
You can clearly see the issues ControlNet tile can have with maintaining a likeness here. Not only has this woman’s likeness changed, but so has her ethnicity. You’ll also see that her face is no longer distorted, and that the pose and colors have remained consistent. Small details like the buttons and the shirt pattern are also fixed. Meanwhile new details have been introduced - the woman is now wearing a necklace, she is wearing less makeup and the shiny material of the outfit is more pared back.
In another example, we upscale a photo of a cat using the fewjative/ultimate-sd-upscale model. The original image is 1024x1024, and we upscale it 2x to 2048x2048 in 49 seconds. We use a prompt to describe the image, and a negative prompt to list things we don’t want.
See how the detail in the cat’s fur is improved, and AI generation errors like the zip and eyes are fixed.
Run in the cloud with an API
Using a ControlNet tile upscaler in the cloud is a great way to improve the quality of images in your website or app. Whether they are from a generative AI model or a real-world source.
Run a ControlNet tile upscaler with JavaScript
We’ll use the batouresearch/high-resolution-controlnet-tile for this example, but the API is similar whichever model you choose.
Start with our official JavaScript client to run the model with Node.js:
npm install replicate
export REPLICATE_API_TOKEN=<your-api-token>
Run batouresearch/high-resolution-controlnet-tile with the following code:
import Replicate from "replicate";
import fs from "fs/promises";

// Import and set up the client
const replicate = new Replicate({
  auth: process.env.REPLICATE_API_TOKEN,
});

// Run the model
const output = await replicate.run(
  "batouresearch/high-resolution-controlnet-tile:latest",
  {
    input: {
      hdr: 0.2,
      image: "https://replicate.delivery/pbxt/K5vab12temDjc8jOnWFJ3p4RD7YWPQ3nuCyXpaRmN9yB8M1h/f84e7869-32ca-444b-a720-19e4325f4347.jpeg",
      steps: 20,
      prompt: "a woman wearing a colorful suit",
      scheduler: "DDIM",
      creativity: 0.6,
      guess_mode: false,
      resolution: 2560,
      resemblance: 0.4,
      guidance_scale: 5
    }
  }
);

// Save the output image
fs.writeFileSync("output.png", output[0]);
You can also run this model using other Replicate client libraries such as for Python, Golang, Swift, Elixir, and others.
Upscaling images with Ultimate SD Upscale
Ultimate SD Upscale is an Automatic1111 extension by Coyote-A. It is a very powerful wrapper around ControlNet tile, giving fine control over all of the parameters, including:
- denoising strength (ie how much of the original image remains in the final result)
- target image size
- opting into a first-pass upscaler before using ControlNet tile (for example Real-ESRGAN)
- the order that tiles are processed in, linear or chessboard. Chessboard can reduce unwanted seams from showing
- the size of the tiles
- the amount of padding around each tile
- the amount of blur applied to the tile masks (to hide seams where tiles are restitched together)
- options for fixing seams after the ControlNet tile upscaling is complete
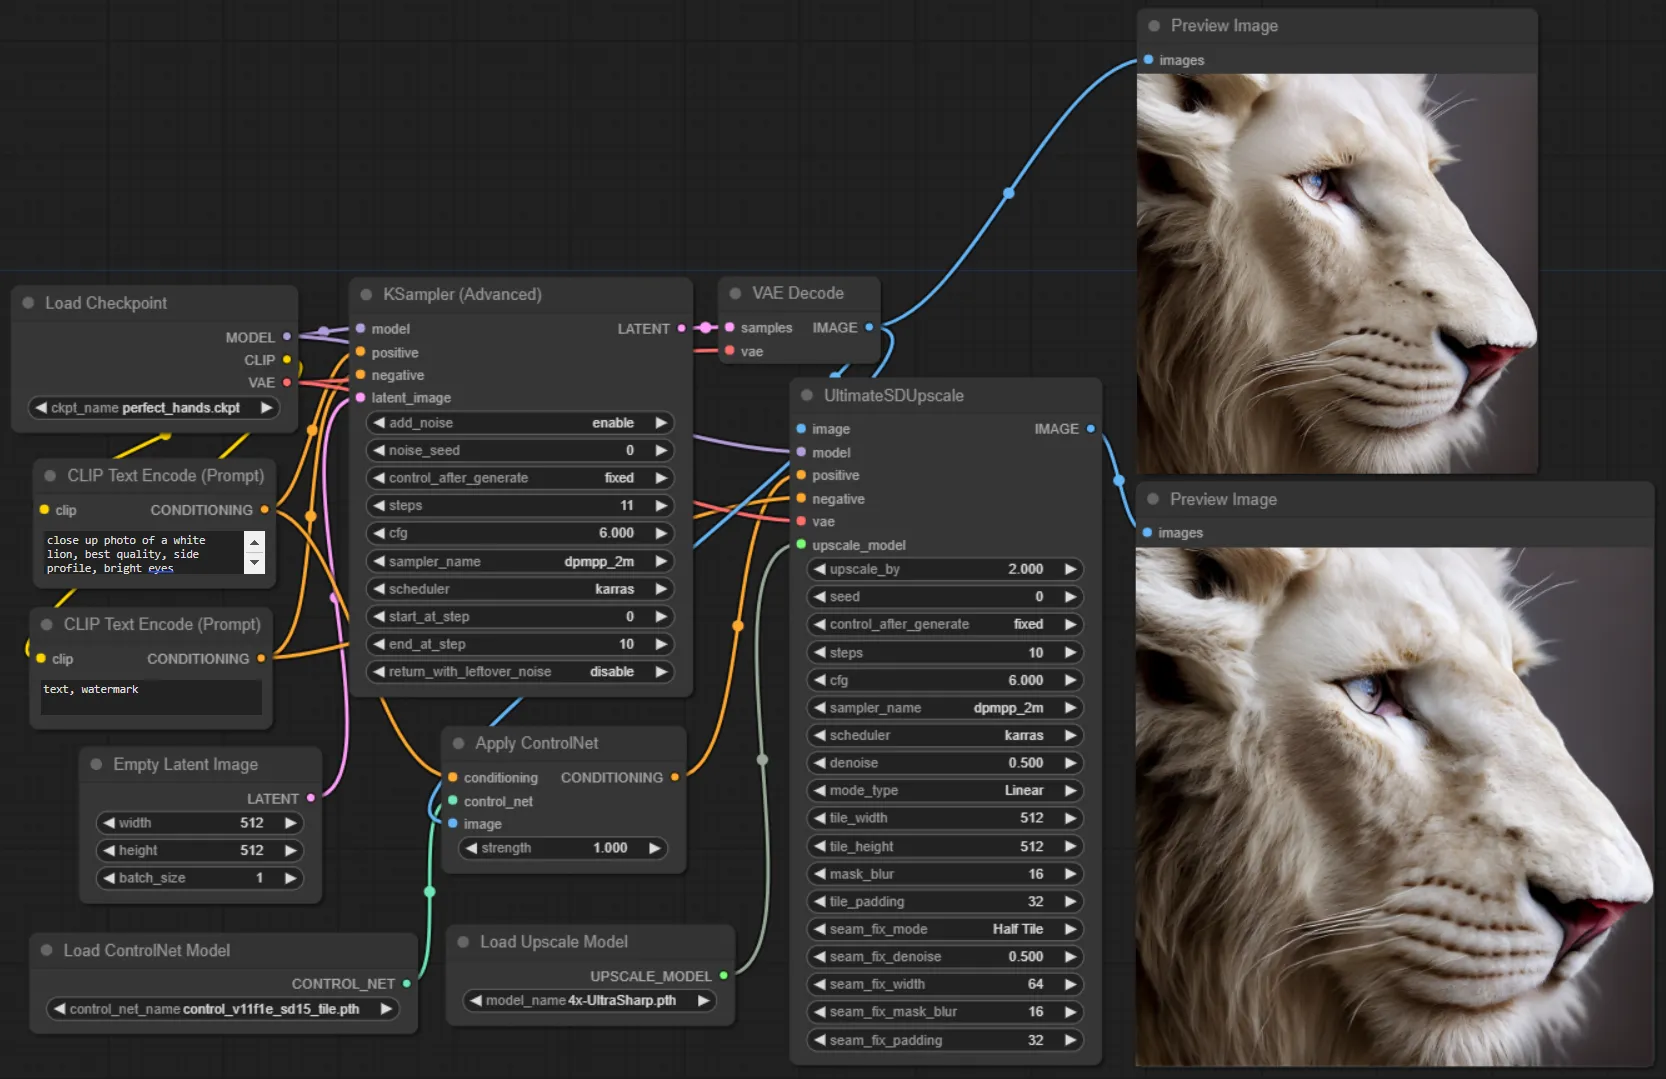
Using with ComfyUI
It has also been ported to ComfyUI as a custom node by ssitu. We recommend this in our ComfyUI guide as a must-have custom node in your workflow.
Run Ultimate SD Upscale with an API
User ‘fewjative’ has wrapped the ComfyUI custom node into a Replicate model that you can run with a production-ready API. Try out fewjative/ultimate-sd-upscale, or run it with an API using our guide below.
Alternatively, if you want to run your own customised ComfyUI workflow, one that incorporates Ultimate SD Upscale, you can use the fofr/any-comfyui-workflow model. Read our ComfyUI with an API guide to learn how.
Running Ultimate SD Upscale with Python
We’ll use fewjative/ultimate-sd-upscale for this example.
Start with our official Python client and read our getting started with Python docs.
pip install replicate
export REPLICATE_API_TOKEN=<your-api-token>
Run fewjative/ultimate-sd-upscale:
import replicate

output = replicate.run(
    "fewjative/ultimate-sd-upscale:latest",
    input={
        "image": "https://replicate.delivery/pbxt/KKOaCNy9baG5cUZfK3YvvePBqZeTxyvytifSo7pFOKLySQN2/ComfyUI_00004_.png",
        "steps": 20,
        "denoise": 0.4,
        "scheduler": "karras",
        "upscale_by": 2,
        "negative_prompt": "ugly, broken, weird",
        "positive_prompt": "a portrait photo of a cat in a green hoodie",
    }
)

# Save the output image
with open('output.png', 'wb') as f:
    f.write(output[0].read())
A more complete example, that incorporates all of the Ultimate SD Upscale parameters might look like this:
output = replicate.run(
    "fewjative/ultimate-sd-upscale:latest",
    input={
        "cfg": 8,
        "image": "https://replicate.delivery/pbxt/KKOaCNy9baG5cUZfK3YvvePBqZeTxyvytifSo7pFOKLySQN2/ComfyUI_00004_.png",
        "positive_prompt": "a portrait photo of a cat in a green hoodie",
        "negative_prompt": "ugly, broken, weird",
        "steps": 20,
        "denoise": 0.4,
        "sampler_name": "euler",
        "scheduler": "karras",
        "upscale_by": 2,
        "upscaler": "4x-UltraSharp",
        "controlnet_strength": 1,
        "use_controlnet_tile": True
        "mask_blur": 8,
        "mode_type": "Linear",
        "tile_width": 512,
        "tile_height": 512,
        "tile_padding": 32,
        "force_uniform_tiles": True,
        "seam_fix_mode": "None",
        "seam_fix_width": 64,
        "seam_fix_denoise": 1,
        "seam_fix_padding": 16,
        "seam_fix_mask_blur": 8,
    }
)

# Save the output image
with open('output.png', 'wb') as f:
    f.write(output[0].read())