Craft generative AI workflows with ComfyUI
Learn ComfyUI then run it with an API
Table of contents
ComfyUI is a simple yet powerful Stable Diffusion UI with a graph and nodes interface. You can use it to connect up models, prompts, and other nodes to create your own unique workflow.
It has quickly grown to encompass more than just Stable Diffusion. It supports SD, SD2.1, SDXL, controlnet, but also models like Stable Video Diffusion, AnimateDiff, PhotoMaker and more.
In this guide we’ll walk you through how to:
- install and use ComfyUI for the first time
- install ComfyUI manager
- run the default examples
- install and use popular custom nodes
- run your ComfyUI workflow on Replicate
- run your ComfyUI workflow with an API
Install ComfyUI
ComfyUI can run locally on your computer, as well as on GPUs in the cloud.
If you’re on Windows, there’s a portable version that works on Nvidia GPUs and CPU. You can download it from the ComfyUI releases page.
Alternatively you can manually install it. Start by cloning the ComfyUI repository and installing the python dependencies.
You can run this in your terminal:
git clone https://github.com/comfyanonymous/ComfyUI

# Optional: You might want to use a virtual environment
cd ComfyUI
python -m venv venv
source venv/bin/activate

# Install ComfyUI dependencies
pip install -r requirements.txt
Start ComfyUI:
python main.pyThere are more detailed instructions in the ComfyUI README.
ComfyUI vs Automatic1111 (A1111)
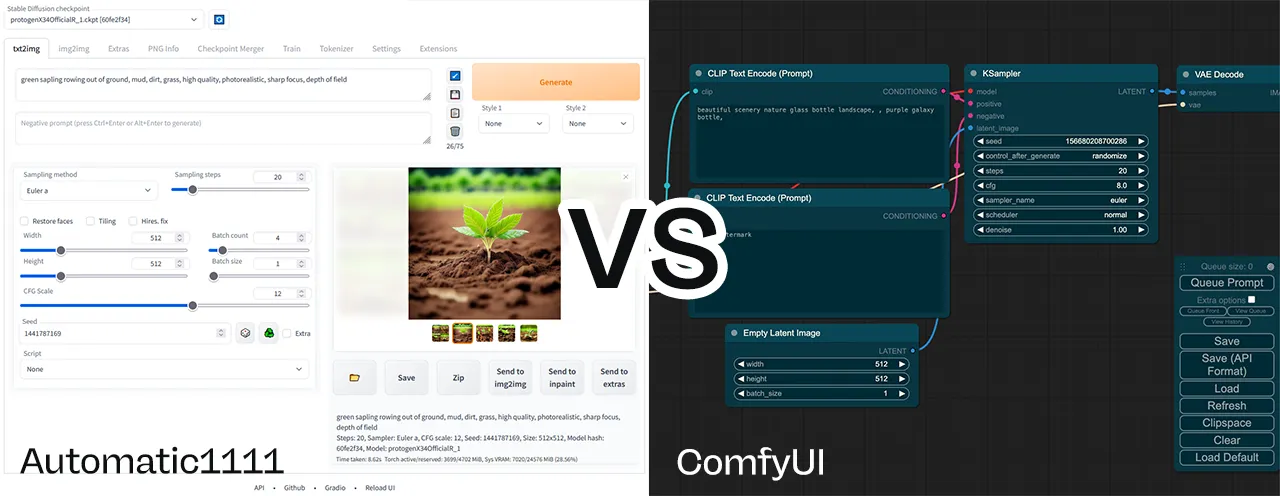
ComfyUI and Automatic1111 (sometimes also called A1111 or stable-diffusion-webui) are the two most popular Stable Diffusion UIs, and they both have their strengths and weaknesses.
If you just want to make images and see results quickly then Automatic1111 is the best choice. It’s a Gradio based interface with many options and plugins. But you can load up a checkpoint, set a prompt and get going. Fooocus is also another good choice for this.
ComfyUI is more powerful and flexible, but it has a steeper learning curve. If you want to explore ControlNet, AnimateDiff, IPAdapters, noise scheduling, prompt walking, and novel workflows using newly released models and tools, then ComfyUI is worth learning.
Use ComfyUI if you like to experiment.
Use ComfyUI manager
Before we start with examples, you should install the ComfyUI manager by ltdrdata. It’s a custom node that makes it easy to manage all your ComfyUI custom nodes and weights.
Install the ComfyUI manager
The simplest way to install ComfyUI-Manager is to clone the repository into your custom nodes directory: ComfyUI/custom_nodes.
cd ComfyUI/custom_nodes
git clone https://github.com/ltdrdata/ComfyUI-Manager.git
You should now have a directory called ComfyUI/custom_nodes/ComfyUI-Manager.
If you’re installing on Linux there are a few extra steps. See the ComfyUI-Manager README for more details.
Start installing models and nodes
Once you’ve installed ComfyUI manager, it’s now very easy to install models and nodes. From the manager menu you can:
- install custom nodes
- install missing custom nodes (very useful when using someone else’s workflow)
- install models (checkpoints, loras, etc.)
You can also use the manager to:
- update all custom nodes
- update ComfyUI
Start by running the ComfyUI examples
The easiest way to get to grips with how ComfyUI works is to start from the shared examples.
Start with the default workflow
The default workflow is a simple text-to-image flow using Stable Diffusion 1.5. It’s one that shows how to use the basic features of ComfyUI. If it’s not already loaded, you can load it by clicking the “Load default” button. You can always reset back to this.
You’ll need one checkpoint for this to work, the default uses v1-5-pruned-emaonly.ckpt. But any Stable Diffusion checkpoint will work – SD1.5, SDXL, SD2.1 or any fine-tune. Remember you can download these models via “Install models” in ComfyUI manager.
To run the workflow, click the “Queue prompt” button. Outputs are saved in the ComfyUI/outputs folder by default.
Try changing this example
Given this default example, try exploring by:
- changing your prompt (CLIP Text Encode node)
- editing the negative prompt (this is the CLIP Text Encode node that connects to the negative input of the KSampler node)
- loading a different checkpoint
- using different image dimensions (Empty Latent Image node)
- changing steps and sampler settings (KSampler node)
Load another workflow
You can load workflows into ComfyUI by:
- dragging a PNG image of the workflow onto the ComfyUI window (if the PNG has been encoded with the necessary JSON)
- copying the JSON workflow and simply pasting it into the ComfyUI window
- clicking the “Load” button and selecting a JSON or PNG file
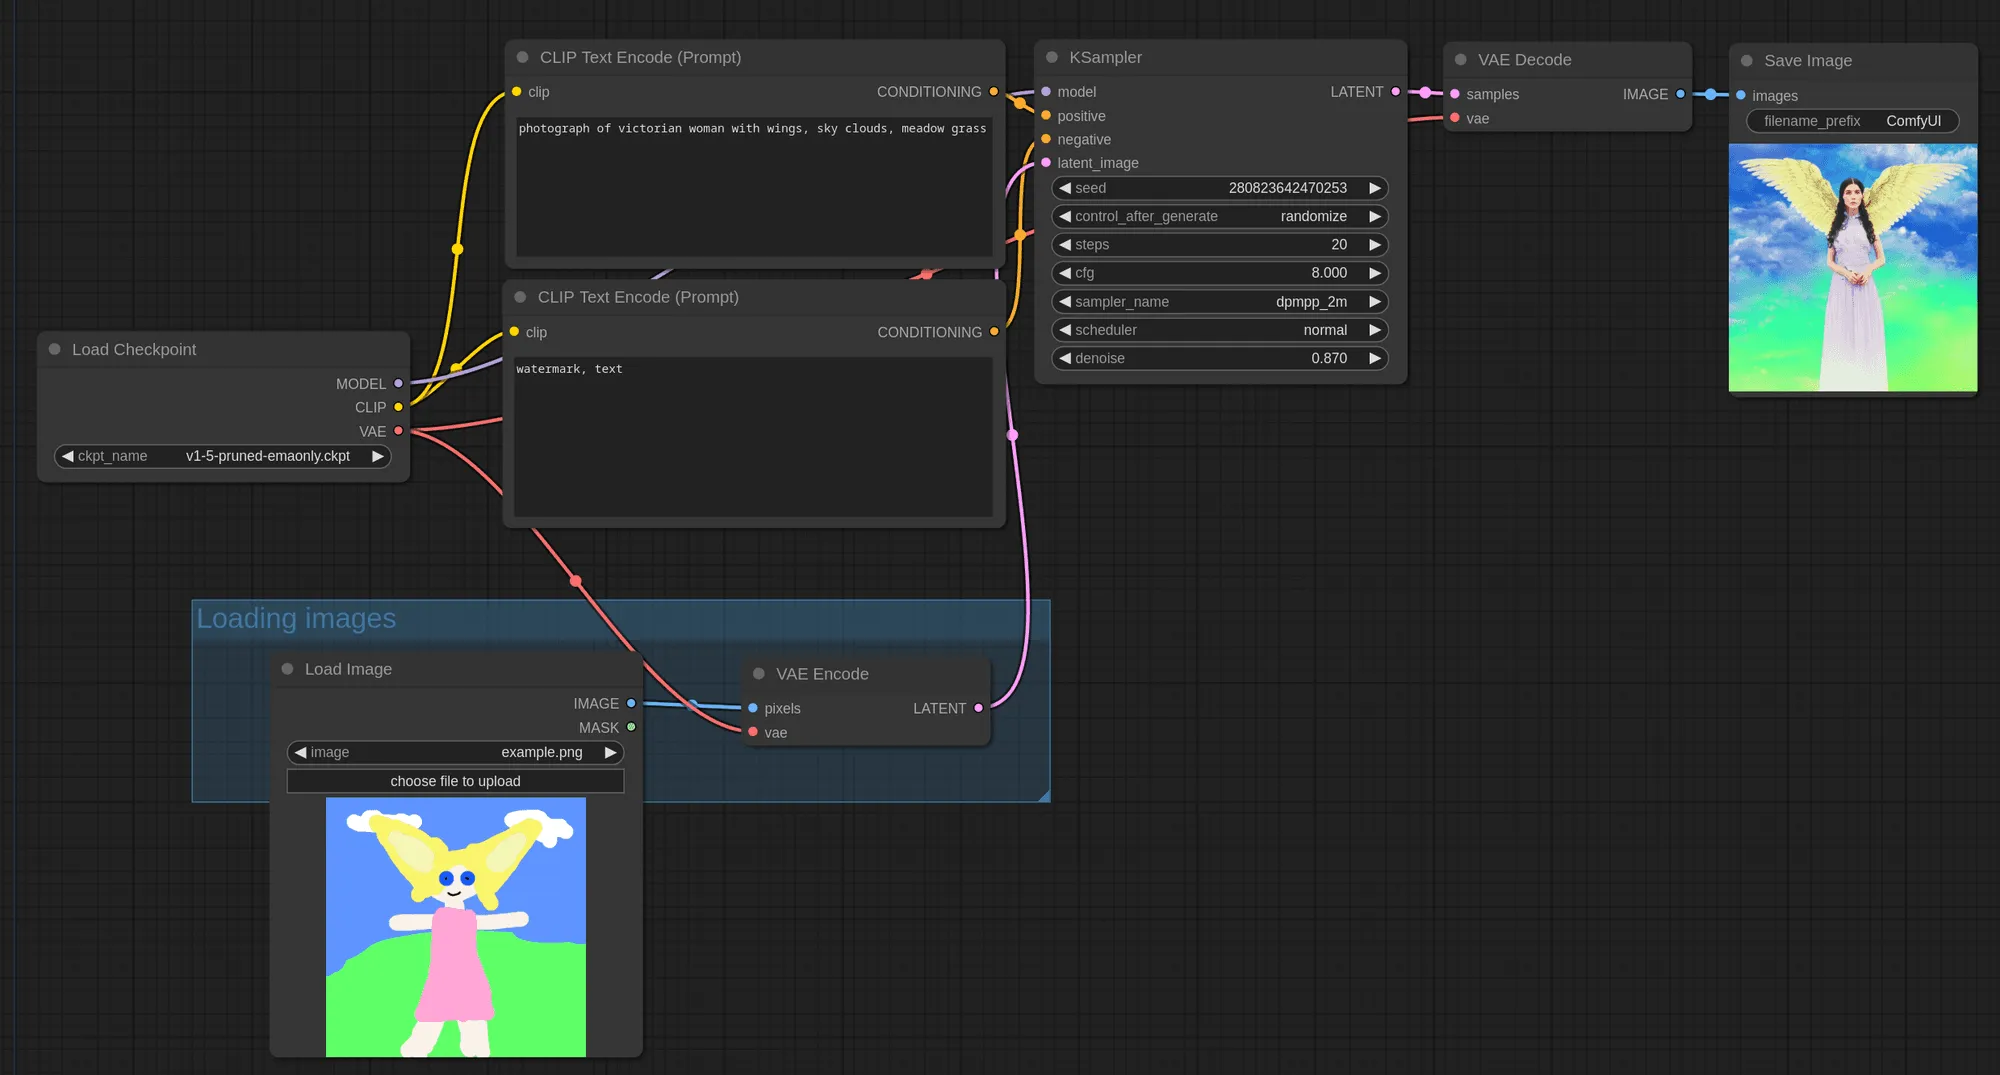
Try dragging this img2img example onto your ComfyUI window:
It works like this:
Popular ComfyUI custom nodes
Now you’re up and running with ComfyUI, you’ll want to start powering-up using some of the best custom nodes that are available.
You should already have the ComfyUI-manager, which you can use to install these. Alternatively, any custom node can be git cloned into your ComfyUI/custom_nodes directory. Make sure you also install any dependencies that are needed.
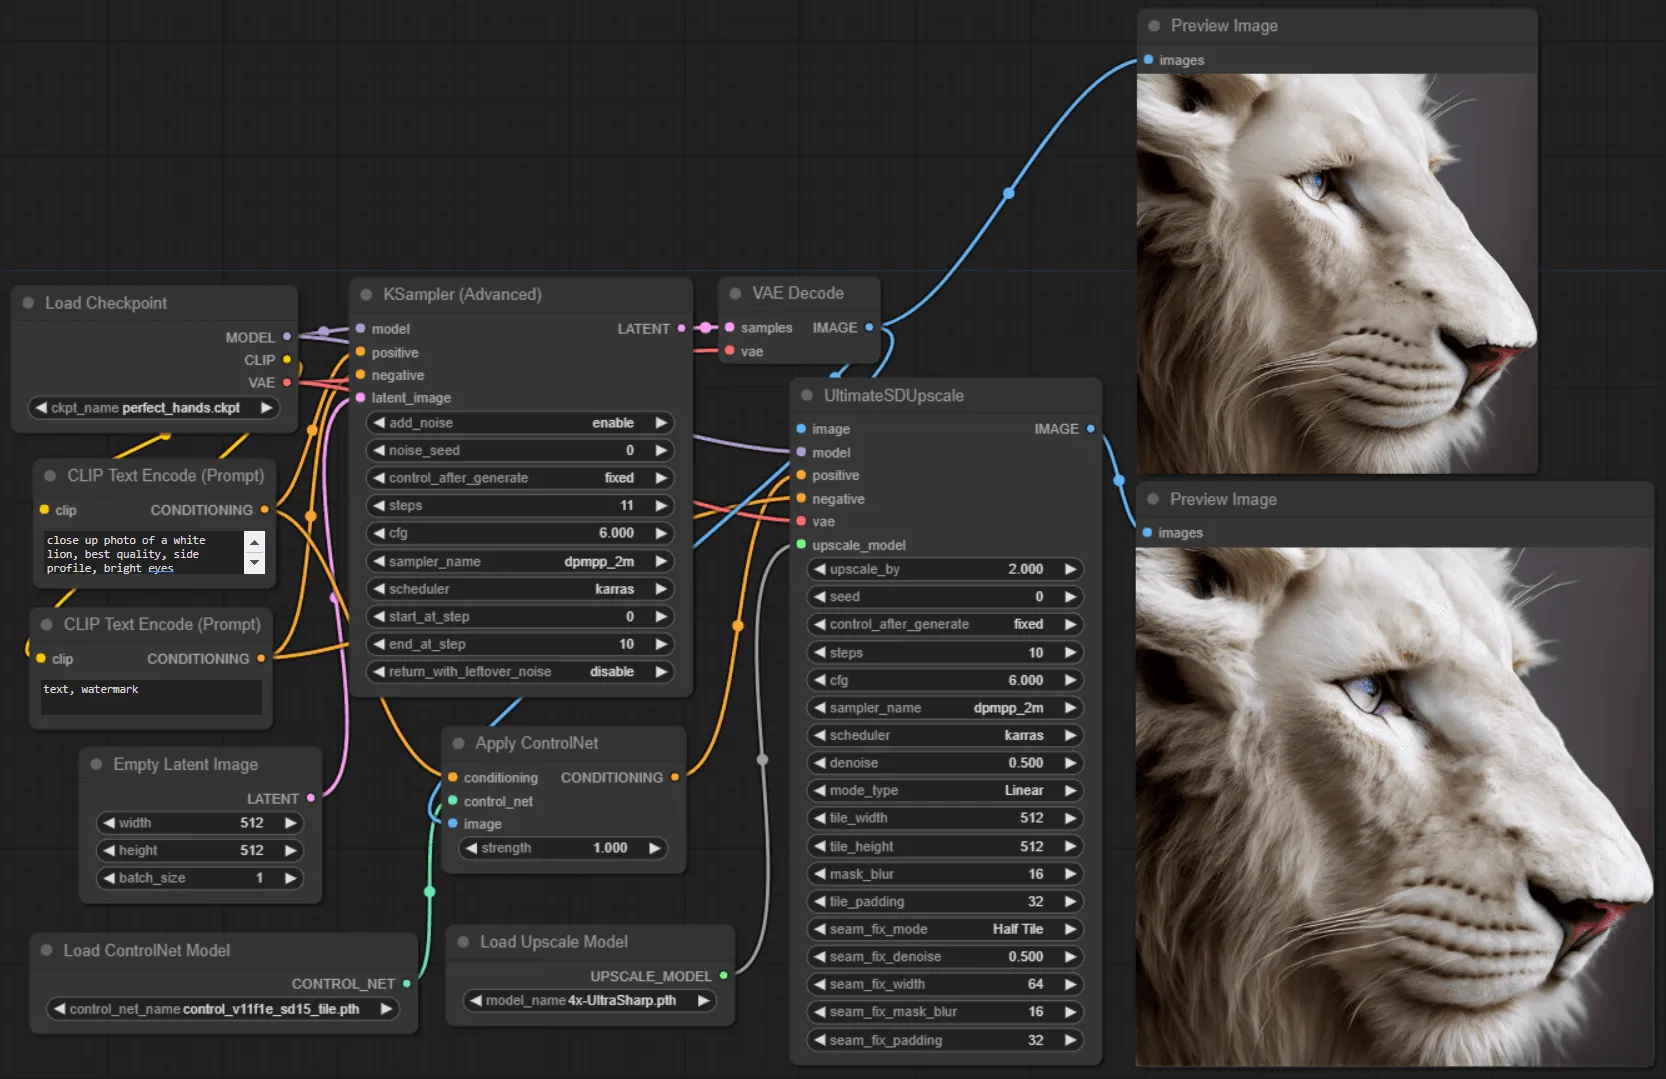
Upscale images
ComfyUI_UltimateSDUpscale is a wrapper around the A1111 equivalent. It’s the goto node for upscaling. Use the controlnet tile upscaling options to get detailed outputs at massive resolutions.
Try running UltimateSDUpscale on Replicate to see what’s possible.
Utilities
ComfyUI Custom Scripts 🐍
ComfyUI Custom Scripts is a set of UI enhancements for ComfyUI, typically enriching the information shown.
You can use it to:
- add autocomplete to your text prompts, very useful for selecting your embeddings from a list
- view extra checkpoint, LoRA and embedding information
- auto arrange your nodes
- snap nodes to a grid
- show an image feed
- lock nodes
- use mathematical expressions (for example when generating latents)
- save your workflows as PNG images
Efficiency nodes
comfyui-efficiency-nodes are a collection of nodes that aim to combine many nodes into one. Use them to streamline workflows and reduce total node count.
AnimateDiff 🎭 and video helpers 🎥
If you’re looking to make videos using AnimateDiff, then Kosinkadink’s ComfyUI-AnimateDiff-Evolved is a must.
Use it to:
- create videos from your checkpoints
- use motion loras to control camera direction
- control your outputs using controlnets
It should be used with ComfyUI-VideoHelperSuite, which can:
- load videos
- combine videos
- preview videos
- make videos from images
Run your ComfyUI workflow on Replicate
You can run ComfyUI workflows directly on Replicate using the fofr/any-comfyui-workflow model.
It works by using a ComfyUI JSON blob. You send us your workflow as a JSON blob and we’ll generate your outputs. You can also upload inputs or use URLs in your JSON.
How to use the Replicate model
Get your API JSON
You’ll need the API version of your ComfyUI workflow. This is different to the commonly shared JSON version, it does not included visual information about nodes, etc.
To get your API JSON:
- Turn on the “Enable Dev mode Options” from the ComfyUI settings (via the settings icon)
- Load your workflow into ComfyUI
- Export your API JSON using the “Save (API format)” button
Gather your input files
If your model takes inputs, like images for img2img or controlnet, you have 3 options:
- Use a URL
- Upload a single input
- Upload a zip file or tar file of your inputs
Using URLs as inputs
If you’re using URLs, you should modify your API JSON file to point at a URL:
- "image": "/your-path-to/image.jpg",
+ "image": "https://example.com/image.jpg",
Uploading a single input
You can also give a single input file when running the model. If this is an image or video, we’ll put it directly into the input directory, as input.[extension] – for example input.jpg.
You can then reference this in your workflow using the filename:
- "image": "/your-path-to/my-picture-001.jpg",
+ "image": "image.jpg",
Uploading a zip file or tar file of your inputs
If your model is more complex and requires multiple inputs, you can upload a zip file or tar file of all of them.
These will be downloaded and extracted to the input directory. You can then reference them in your workflow based on their relative paths.
So a zip file containing:
- my_img.png
- references/my_reference_01.jpg
- references/my_reference_02.jpg
Might be used in the workflow like:
"image": "my_img.png",
...
"directory": "references",
We’ll always validate that your inputs exist before running your workflow.
Run your workflow
With all your inputs ready, you can now run your workflow.
There’s a couple of extra options you can use:
return_temp_files– Some workflows save temporary files, for example pre-processed controlnet images. Use this option to also return these files.randomise_seeds– Usually you want to randomise your seeds, so we’ve made this easy for you. Set this option totrueto randomise all your seeds.
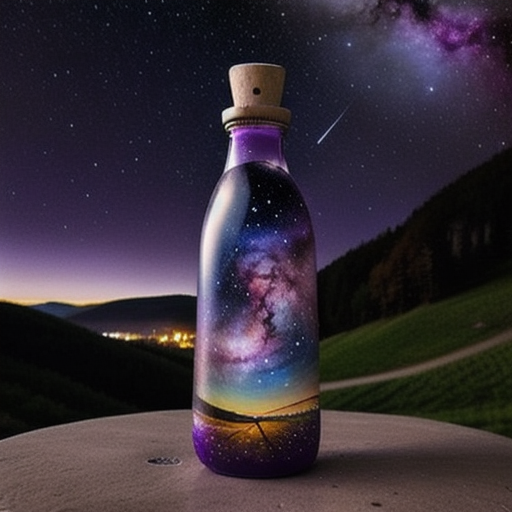
An example output
Supported weights
We support the most popular model weights, including:
- SDXL
- RealVisXL 3.0
- Realistic Vision 5.1 and 6.0
- DreamShaper 6
- TurboVisionXL
- Stable Video Diffusion
- AnimateDiff
- LCM Dreamshaper
- LCM LoRAs
Also included are all the popular controlnets and preprocessors. We recommend using the comfyui_controlnet_aux custom node for preprocessors. And ComfyUI Advanced ControlNet is included if you really know what you’re doing.
View the complete list of supported weights or request a weight by raising an issue.
If your exact model isn’t supported, you can also try switching to the closest match. Just update your JSON to use a different model filename.
Custom nodes
Again, we’ve tried to include the most popular custom nodes.
Some of the custom nodes included are:
- ComfyUI IPAdapter Plus
- ComfyUI Controlnet Aux
- ComfyUI Inspire Pack
- ComfyUI Logic
- ComfyUI AnimateDiff Evolved
- ComfyUI VideoHelperSuite
- ComfyUI Advanced ControlNet
- Efficiency Nodes ComfyUI
- Derfuu ComfyUI ModdedNodes
- ComfyUI FizzNodes
View the complete list of supported custom nodes. You can also raise an issue to request more custom nodes, or use the GitHub repo as a template to roll your own.
Run ComfyUI with an API
You can run ComfyUI workflows on Replicate, which means you can run them with an API too. Take your custom ComfyUI workflow to production.
You can use our official Python, Node.js, Swift, Elixir and Go clients.
We recommend you follow these steps:
- Get your workflow running on Replicate with the
fofr/any-comfyui-workflowmodel (read our instructions and see what’s supported) - Use the Replicate API to run the workflow
- Write code to customise the JSON you pass to the model (for example, to change prompts)
- Integrate the API into your app or website
Get your API token
You’ll need to sign up for Replicate, then you can find your API token on your account page.
Run your workflow with Python
In this example we’ll run the default ComfyUI workflow, a simple text to image flow.
Install Replicate’s Python client library:
pip install replicateSet the REPLICATE_API_TOKEN environment variable:
export REPLICATE_API_TOKEN=r8-*********************************Import the client and run the workflow:
import json
import replicate

output = replicate.run(
    "fofr/any-comfyui-workflow:latest",
    input={
        "workflow_json": json.dumps({
            "3": {
                "inputs": {
                    "seed": 156680208700286,
                    "steps": 20,
                    "cfg": 8,
                    "sampler_name": "euler",
                    "scheduler": "normal",
                    "denoise": 1,
                    "model": ["4", 0],
                    "positive": ["6", 0],
                    "negative": ["7", 0],
                    "latent_image": ["5", 0]
                },
                "class_type": "KSampler",
                "_meta": {"title": "KSampler"}
            },
            "4": {
                "inputs": {
                    "ckpt_name": "Realistic_Vision_V6.0_NV_B1_fp16.safetensors"
                },
                "class_type": "CheckpointLoaderSimple",
                "_meta": {"title": "Load Checkpoint"}
            },
            "5": {
                "inputs": {
                    "width": 512,
                    "height": 512,
                    "batch_size": 1
                },
                "class_type": "EmptyLatentImage",
                "_meta": {"title": "Empty Latent Image"}
            },
            "6": {
                "inputs": {
                    "text": "beautiful scenery nature glass bottle landscape, purple galaxy bottle,",
                    "clip": ["4", 1]
                },
                "class_type": "CLIPTextEncode",
                "_meta": {"title": "CLIP Text Encode (Prompt)"}
            },
            "7": {
                "inputs": {
                    "text": "text, watermark",
                    "clip": ["4", 1]
                },
                "class_type": "CLIPTextEncode",
                "_meta": {"title": "CLIP Text Encode (Prompt)"}
            },
            "8": {
                "inputs": {
                    "samples": ["3", 0],
                    "vae": ["4", 2]
                },
                "class_type": "VAEDecode",
                "_meta": {"title": "VAE Decode"}
            },
            "9": {
                "inputs": {
                    "filename_prefix": "ComfyUI",
                    "images": ["8", 0]
                },
                "class_type": "SaveImage",
                "_meta": {"title": "Save Image"}
            }
        }),
        "randomise_seeds": True,
        "return_temp_files": False
    }
)

# Save all generated images
for i, file_output in enumerate(output):
    with open(f'output_{i}.png', 'wb') as f:
        f.write(file_output.read())
Customise your workflow
You’ll want to customise your workflow, to send in different prompts and other options. You can do this by changing the JSON you pass to the model.
For example, you could change the checkpoint and prompt like this:
import json
import replicate

def load_workflow_from_file(file_path):
    with open(file_path, 'r') as file:
        return json.load(file)

def update_checkpoint_name(workflow, new_name):
    workflow["4"]["inputs"]["ckpt_name"] = new_name

def update_prompt(workflow, new_prompt):
    workflow["6"]["inputs"]["text"] = new_prompt

workflow = load_workflow_from_file('workflow.json')
update_checkpoint_name(workflow, "sd_xl_base_1.0.safetensors")
update_prompt(workflow, "a photo of a comfy sofa")

output = replicate.run(
    "fofr/any-comfyui-workflow:latest",
    input={
        "workflow_json": json.dumps(workflow),
        "randomise_seeds": True,
        "return_temp_files": False
    }
)
print(output)
Run your workflow with JavaScript
import Replicate from "replicate";

const replicate = new Replicate({
  auth: process.env.REPLICATE_API_TOKEN,
});

const workflowJson = {
  "3": {
    "inputs": {
      "seed": 156680208700286,
      "steps": 20,
      "cfg": 8,
      "sampler_name": "euler",
      "scheduler": "normal",
      "denoise": 1,
      "model": ["4", 0],
      "positive": ["6", 0],
      "negative": ["7", 0],
      "latent_image": ["5", 0]
    },
    "class_type": "KSampler",
    "_meta": {
      "title": "KSampler"
    }
  },
  "4": {
    "inputs": {
      "ckpt_name": "Realistic_Vision_V6.0_NV_B1_fp16.safetensors"
    },
    "class_type": "CheckpointLoaderSimple",
    "_meta": {
      "title": "Load Checkpoint"
    }
  },
  "5": {
    "inputs": {
      "width": 512,
      "height": 512,
      "batch_size": 1
    },
    "class_type": "EmptyLatentImage",
    "_meta": {
      "title": "Empty Latent Image"
    }
  },
  "6": {
    "inputs": {
      "text": "beautiful scenery nature glass bottle landscape, purple galaxy bottle,",
      "clip": ["4", 1]
    },
    "class_type": "CLIPTextEncode",
    "_meta": {
      "title": "CLIP Text Encode (Prompt)"
    }
  },
  "7": {
    "inputs": {
      "text": "text, watermark",
      "clip": ["4", 1]
    },
    "class_type": "CLIPTextEncode",
    "_meta": {
      "title": "CLIP Text Encode (Prompt)"
    }
  },
  "8": {
    "inputs": {
      "samples": ["3", 0],
      "vae": ["4", 2]
    },
    "class_type": "VAEDecode",
    "_meta": {
      "title": "VAE Decode"
    }
  },
  "9": {
    "inputs": {
      "filename_prefix": "ComfyUI",
      "images": ["8", 0]
    },
    "class_type": "SaveImage",
    "_meta": {
      "title": "Save Image"
    }
  }
};

const output = await replicate.run(
  "fofr/any-comfyui-workflow:latest",
  {
    input: {
      workflow_json: JSON.stringify(workflowJson),
      randomise_seeds: true,
      return_temp_files: false
    }
  }
);
console.log(output);